| |
| |
Mastering
3D Studio MAX R3 |
Turn On Vertex Ticks You want to be able to see your vertices
even when they’re not selected. You can turn them on in the Display
tab, or by right-clicking the object, choosing Properties from the shortcut
menu, and checking Vertex Ticks.
Hide and Unhide Vertices To prevent selection of the wrong vertices,
select the vertices that you are not working with and click Hide in the
Modify tab at the Vertex level. Click Unhide All when you want to work
on a new section.
Save Versions Often To avoid losing a lot of work, save a new
version of your file fairly often. At the end of the day, you can keep
the most recent versions and delete all those you no longer need.
Troubleshooting When Your Surface Disappears
Sometimes while working with Surface Tools, your surface, or part of
it, will disappear. Don’t panic (yet). Here are some possible reasons
and solutions.
Redraw the Screen It could be just a display problem. Press the
number 1 to redraw the viewport, zoom in a little, or re-open the file.
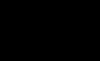
Adjust the Threshold If you just applied a Surface modifier and
the surface or part of the surface isn’t showing, try adjusting the
Threshold in the Parameters rollout for the Surface modifier. Sometimes,
for no apparent reason, the Surface modifier will be finicky about the
threshold. Small increments can make a difference, as in the example shown
in Figure 5.15.

FIGURE
5.15 Identical spline cages can get different
results depending on the Surface threshold.
Check Normals The normal of a surface is the vector pointing outward
from it that determines which side is facing and which is its back. By
default, only the facing side is drawn. In the process of building your
spline cage, the corresponding surface will interpret which side is the
facing one differently as you go along. Try checking or unchecking Flip
Normals (on the Surface modifier of the reference), and rotate your view
until you can see the other side of the surface. If you’re still
unsure, apply a material with the 2-Sided option checked in order to see
both sides of the surface in the viewport.
Check the Number of Sides You will only get a surface for a section
of the spline cage bounded by three or four sides. Check to see whether
the area that is missing a surface includes more than four points of the
cage.
Fuse Vertices Sometimes, even when using Vertex Snap, vertices
aren’t really coincident. The Fuse button within the Editable Spline
commands makes selected vertices coincident without welding them together.
If a section of your surface has three or four sides and still isn’t
showing a surface, try marquee-selecting each of the corners and clicking
Fuse to make them coincident.
Detaching Splines to CrossSection
Let’s say that you have a spline cage and want to do the equivalent
of extruding one of the areas defining a patch in the corresponding surface.
If you just drag the vertices out, you won’t get a crease in the
model where you want it. If you clone the splines that border the area
you want to “extrude,” you also need all the splines defining
the sides of the extrusion. You really want to use CrossSection, but CrossSection
can’t be limited to a sub-object selection, and CrossSection requires
that the splines be attached in a logical order. If you applied CrossSection
to your model, you would get a mess.
Let’s look at an example using another rudimentary spline cage.
This exercise is pretty deep, going into a specialized technique; to save
some space, we’ll group related actions together, so read each step
carefully.
- 1. Reset MAX.
- 2. In the left viewport, create a rectangle (Create
Ø Shapes Ø
Rectangle) and name it Spline Cage. Using the Move tool, Shift-drag
the rectangle to the left. Choose 5 Copies from the dialog box.
- 3. Select the first rectangle and convert it to
an editable spline. Click the Attach button and click each of the rectangles
in order. Apply a CrossSection modifier to create a spline cage.
Click the Edit Stack button again, click Collapse All, Yes, and then
OK to collapse to an editable spline again.
- 4. Choose Edit Ø
Clone. In the next dialog box, check Reference and type Surface
in the Name field. With this Surface clone still selected, apply a Surface
modifier. Check Flip Normals and Remove Interior Patches. Then press
Alt+X to put the reference surface in see-through mode.
|
|
|

| NOTE A reference
has a one-way connection from the original object. Unlike a copy,
any changes you make to the original will update in the reference.
Unlike an instance, none of the changes you make to the reference
(such as applying Surface) will apply to the original. This way you
can edit the cage while watching the effect on the resulting surface
as you work.
|

| 5. Using the Select
by Name tool, select Spline Cage again. Let’s say we want to
extrude just the area corresponding to the third quad patch on the
top of the model. Click the Spline sub-object button and click around
that area. Notice that you can’t select that “rectangle”
because the segments that form it are parts of other splines. To define
the area we want to extrude, we need to break the splines going through
it.
|

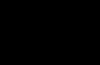
| 6. Click the Vertex
sub-object button. In the front viewport, marquee-select just the
vertices that define the area we want, as in Figure 5.16. The bottom
of the Selection rollout should read “8 Vertices Selected.”
Click the Break button in the Geometry rollout. This breaks all the
splines that cross at these points, creating two vertices everywhere
a spline was broken. If you marquee-select the exact same area of
the front viewport again, the Selection rollout will now read “16
Vertices Selected.”
|
FIGURE
5.16 Select these vertices.

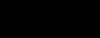
| 7. Click the Segment
sub-object button. Using Ctrl to add to your selection and Alt to
subtract, carefully select all the segments that border the area you
want to extrude, as shown in Figure 5.17.
|
FIGURE
5.17 Now select these segments.
- 8. Towards the bottom of the Geometry rollout, check
Copy and then click the Detach button. Click OK to detach a copy of
the selected splines as a separate object (in the same place as the
existing splines of our spline cage object). Right-click the spline
cage and choose Sub-Object Ø Base
Object from the shortcut menu to get out of sub-object mode.
- 9. To help CrossSection work, we must make our segments
into a single spline. Using Select by Name, select the Shape01 object
that we just created. Click the Vertex sub-object button and select
all the vertices of the shape. With the weld threshold set to 1.0, click
the Weld button. Click the Spline sub-object button and select the shape;
notice that we now have one spline. Click the Sub-Object button to get
out of the sub-object level.
- 10. Using Select by Name, select Shape01 and drag
it upwards in the front or left viewport. Choose 3 Copies from the dialog
box and click OK. Select Shape01 again, click the Attach button, and
pick on each of the new shapes in order. Apply a CrossSection modifier
and then collapse the stack. You now have a second spline cage that
is an extension of the first.
- 11. Click on the Vertex sub-object button. Using
Move and Scale, shape the extension any way you choose. When using Scale,
make sure you have Use Selection Center selected. Don’t move the
vertices where the extension connects to the first spline cage, because
you need the splines on the side to connect back to the vertices on
the main object.
|
|
|

| WARNING While
shaping this extension, remember to always use marquee-select and
to only scale vertices rather than splines. If you scale, say, the
second cross section, you will leave behind the coincident vertices
of the splines forming the sides of the cage and have no basis for
a surface.
|
© 2000, Frol (selection,
edition, publication)
|
|
)
)
)
)
)
)