| |
The JPEG Format
The JPEG (Joint Photographic Experts Group) format is ideal for displaying
photographs or full-color graphics because it supports palettes of up
to 16 million colors (and even beyond, although there is no point in using
deeper palettes for Web graphics). JPEG is also very aggressive in its
compression. Unlike with the GIF format, though, this compression comes
at a price: JPEG files lose their fidelity as they are compressed. You
do have control over how much compression you use, and therefore how much
fidelity loss you introduce.
The other compromise you must deal with is the absence of the transparency
control you have with the GIF format. This is rarely an issue with photographs,
as they are usually rectangular, but there will be times when you will
wish for a transparency feature for JPEG images.
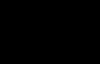
Figure 20.9 is the starting point for our exploration into JPEG file
creation. It is the same rectangle used before, but it is filled with
a bitmap pattern fill instead of a fountain fill.
FIGURE
20.9 These stones have more shades and colors
than can be faithfully reproduced with 256 colors. That makes it a good
candidate for the JPEG format.
Here’s what you need to do to prepare for our next laboratory test:
- 1. Switch to your text editor and open the HTML
file you created for working with GIF files (we called ours My
Web Page.htm).
- 2. Make the following change.
Save and close the file—now you’re ready to begin. Switch to
DRAW and replace the fountain fill in your rectangle with a bitmap pattern
fill (you can use the stones as we did, or pick another one).
- 1. Export the rectangle, this time choosing the
JPEG Bitmaps format. Call the graphic rectangle.jpg (the
name you have already designated in the HTML file) and make sure that
it is being written to the same directory.
- 2. Choose RGB Color for the palette, set the Size
to 1 to 1, and the Resolution to 96dpi.
- 3. OK this dialog, and you will be taken to a subdialog.
The two key elements here are Compression and Smoothing. As you move
those sliders to the right, they each affect the display of the image
and the resultant file size. You can click Preview to see a dynamic representation
of each adjustment, as well as an approximation of file size.
- 4. Set both sliders to 0 and OK this dialog to write
the image.
- 5. Switch to your browser and refresh the page.
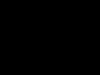
It should look like Figure 20.10.
If the picture of the rocks does not display, it means that the name
you designated in the HTML file is not the same as the one you just used
when you exported the image from DRAW, or you did not export rectangle.jpg
into the same location.
FIGURE
20.10 When exported at the lowest compression
level, these rocks look as good as they do in DRAW.
The stones display at the highest possible fidelity, and they also consume
over 130KB of disk space. As you have probably already guessed, when you
move those controls to the right, the image size shrinks and the quality
of the image is reduced. Small increases in compression are not likely
to be noticeable, and every image will have its own threshold—the
point beyond which increases in compression do result in image degradation.
The responsibility is yours to find that threshold, and you can practice
the routine with these stones: export the image with different compression
and smoothing values, and then switch to your browser to see the difference.
Two other controls are found on the compression and smoothing dialog.
The JPEG format has its own version of the interlace control, and it’s
called Progressive. It is much more subtle than the Interlaced effect
on GIF images, and in fact, we don’t use it very often. The Optimize
check box instructs DRAW to use the most efficient encoding method possible.
This check box is a bit ahead of its time; in fact, we suspect that 95
percent of the time that you arrive at this dialog, you will address Compression
and Smoothing and ignore all else.
|

| NOTE As with
all types of publishing and “printing,” nothing takes the
place of trial, error, and observation. In that spirit, we have created
a comprehensive Web page whose sole purpose is to demonstrate the
various controls and settings discussed here. It is located on our
lead author’s Web site at www.altman.com/webgraphics.
This page uses four independent frames so you can make side-by-side
comparisons of images with different color depths and settings. It
is ideal for developing a feel for the controls and how they affect
image quality. You can either work this page from altman.com,
or download all of the files and open them from your own hard drive
for better performance. If you do, make sure to place them all in
the same directory.
|
|
Animated GIF Files
We approach this topic with fear and trepidation. Please raise
your right hand and repeat after us:
- I will not abuse the power of Animated GIF files. I will
not use them inappropriately, and I will resist all urges to use
them on every page that I create.
Okay, with that out of the way, we can now explain to you that
the GIF format is capable of containing multiple images in a file,
each in its own frame. When the file is read from a Web page, each
of the images is displayed in rapid succession. This gives the appearance
of animation, much the way that Saturday morning cartoons are displayed
on television. The alternative is to resort to complex script programming
using Java or CGI—a fate on par with watching a dishwasher
operate from the inside.
DRAW does not know how to create animated GIFs, but PHOTO-PAINT
does. Using its movie feature, PAINT stitches multiple images together
into an animation. PAINT’s movies can be saved as AVI files
or animated GIF files, and the current versions of Internet Explorer
and Navigator support animated GIFs.
Creating an Animation
The steps for creating an animated GIF file are beyond the scope
of this chapter, but to the rescue comes the companion page on the
Sybex Web site. From there, open flight.htm to see
a simple animation in action. From that page, you can also take
a tour of how it was built, complete with step-by-step instructions
and illustrations.
And once again, please keep in mind the potential distraction that
animated GIF files can cause if they are used frivolously (not to
mention the fact that they take longer to load than conventional
graphics). If you expect your visitors to spend several minutes
on the same page, nothing could be worse than making them watch
something constantly blink, or flash, or scroll. If, on the other
hand, you want to highlight a special offer on a page designed to
be a launching point (meaning that viewers won’t spend much
time there), then creating a button that changes from one color
to another might be an effective way to do it. But make sure to
not set it for an endless loop—one or two cycles will be just
fine.
Remember our admonition from Chapter 18: if you make everything
bold, you have made nothing bold. If you animate in the wrong places
or for the wrong reasons, you doom your original purpose.
|
|
|
)
)
)
)
)
)