| |
| |
Mastering
3D Studio MAX R3 |
Shaping Patches
Adjusting patches to shape them is very similar to shaping Bezier splines,
as we did earlier in the chapter.

| 1. Click the Vertex
Sub-Object button and select the vertex in the center of the four
patches.
|
- 2. In the front viewport, move the vertex upwards
to form a hill.
- 3. Move one of the Bezier handles on the vertex.
Notice that the default is the Corner type, like the Bezier Corner tangents
we used with splines.
- 4. Right-click the vertex and choose Coplanar from
the shortcut menu.
- 5. Move one of the handles again. This time the
handles are dependent.
|
|
|

| TIP Coplanar
tangents make it easier to create a smoothly continuous curve; Corner
tangents make it easier to create a precise change in curvature.
|
Taking Advantage of Patch Surface Options
Let’s take a look at the beauty of working in patches.
- 1. In the Modifier Stack rollout, click the Sub-Object
button to get out of the Sub-Object level.
- 2. Scroll down to the Surface section of the Modify
tab. Notice that there are separate settings for View Steps and Render
Steps.
- 3. Right-click the label of the perspective viewport
and choose Edged Faces from the shortcut menu. This shows us the effect
of surface steps.
|
|
|
|
| TIP Edged
Faces displays patch steps and polygons in viewports set to Smooth+Highlight.
|
- 4. Change View Steps to 15. Increasing the steps
makes the patch surface much smoother, as can be seen in the before
and after shots in Figure 5.7. The power of the two settings is that
you can model with low steps in the viewport to keep your speed fast,
render trials with slightly higher steps, and use high steps for the
final render to get very smooth curves.
- 5. Change the View Steps to 5 and the Render Steps
to 12.
- 6. Uncheck Show Interior Edges to show just the
edges of the patches.
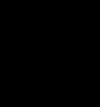
FIGURE
5.7 Top, a patch surface with 5 steps; bottom,
15 steps
Adding New Patches
To continue to build in patches, you need to add patches at the edge
level.

| 1. Click the Edge Sub-Object
button.
|
- 2. Select an outer edge of one of the patches.
- 3. Click the Add Quad button in the Geometry rollout.
MAX adds a new four-sided patch to that edge.
Attaching and Welding Patch Surfaces
As with mesh, spline and NURBS objects, you can attach separate patches
as sub-objects of one object. You can then “sew” the pieces
together by welding vertices.
- 1. Click the Sub-Object button to get out of the
sub-object level.
- 2. In the top viewport, create another patch grid
near the newly added patch, as in Figure 5.8.
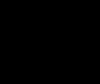
FIGURE
5.8 Create a new patch.
- 3. Using one of the select tools, select the first
patch object.
- 4. Go to the Modify tab and click the Attach button
in the Geometry rollout.
- 5. Click the newly created patch. The new patch
changes color to match the first patch and is now part of the same object.
- 6. Click the Attach button again to turn it off.
- 7. Click the Vertex Sub-Object button.
- 8. In the top viewport, marquee-select the 2 vertices
near the edge.
- 9. Turn the weld threshold spinner (next to the
Weld button in the Geometry rollout) up to about 30 and click the Weld
button. The 2 vertices should weld into one, connecting the surfaces
at one point.
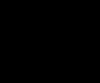
- 10. Select the other 2 adjacent vertices and click
Weld again. You should now have one smoothly continuous patch surface,
as in Figure 5.9, which can of course be further shaped by the methods
covered earlier.
FIGURE
5.9 Newly welded patches
Using Interior Vertices
The default Bezier handles control the curvature of the vertices on the
corners of the patch. Additional control of the curvature is available
through interior vertices. You can access these by choosing Manual
Interior from the right-click shortcut menu on the Patch level, and then
going to the Vertex sub-object level. Yellow squares appear that allow
you to change the curvature of the interior of the patch.
Converting
a Loft Object to Patches
Another way of patch modeling is to get part of the way there through
the techniques of mesh modeling we’ve already covered, convert to
patches, and continue to edit using the patch modeling methods above.
All the mesh primitives can be converted to patches and, in an especially
useful feature, loft objects can also be converted to patches.
Shaping a Loft Using Scale Deformation
First we need to create a loft object to convert to patches.
- 1. Reset MAX.
- 2. Create a small circle in the left viewport (radius
about 20).
- 3. Create a line across the top viewport, clicking
once on the left, once on the right, and then right-clicking to complete.
- 4. With the line selected, make a loft object (Create
Ø Geometry Ø
Compound Objects Ø Loft).
- 5. Click Get Shape and then select the circle.
- 6. Select your loft object and go to the Modify
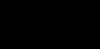
tab, scrolling down to open the Deformations rollout at the bottom.
Click the Scale Deformation button. This brings up the dialog box seen
in Figure 5.10.
FIGURE
5.10 The Scale Deformation dialog box

| 7. Click the Insert
Corner Point button and click three places between the endpoints of
the line in the dialog box.
|

| 8. Click the Move Control
Point button to move the first point down. Notice that the loft is
scaled proportionally as you do this.
|
- 9. Marquee-select the second and third points (of
five total points) and right-click one of them. Choose Bezier Smooth
from the shortcut menu.
- 10. Right-click the fourth point and choose Bezier
Corner from the shortcut menu.
- 11. Using the Move Control Point tool to move the
points and the handles, create a graph that looks about like Figure
5.11.
- 12. Close the Scale Deformation dialog box.
Converting to Patches
When converting a mesh to patches, MAX assigns patches based on the number
of faces of the mesh. To use patches efficiently, we want as few vertices
as possible. Let’s optimize the loft before converting it to patches.
- 1. With the loft still selected, open up the Skin
Parameters section of the Modify tab.
- 2. Change the Shape Steps and the Path Steps to
2. This reduces complexity of the loft a great deal.
FIGURE
5.11 Create a scale deformation like this one.
|
|
|

| NOTE You can
output a loft object directly to patches by checking Patch instead
of Mesh under Output in the Surface Parameters rollout of the loft.
The only problem with this is that it gives you no control over the
number of patches you get. By adjusting our shape and path steps,
outputting to mesh, and then applying an Edit Patch, we get fairly
precise control over the subdivision of the resulting patch object.
|
- 3. Apply an Edit Patch modifier to the loft. Since
we are only using this as a starting point, it doesn’t matter if
our model is distorted at this point.
- 4. Click the Vertex Sub-Object button.
- 5. Now you can move around the vertices and their
tangents to shape the object however you like.
- 6. To smooth things out when you are done, apply
a Relax modifier, and set the Relax Value to 1.
|
|
|
|
| NOTE A simple
example of this exercise is available on the CD as loft_patch.max.
|
© 2000, Frol (selection,
edition, publication)
|
|
)
)
)
)
)
)
)
)
)
)