| |
| |
Mastering
3D Studio MAX R3 |
Binding the
Displace to the Faucet
Now let’s unhide the loft object and get the Displace space warp
to work its magic on the faucet.
- 1. Open faucet_5.max from the CD
or continue working from your current scene.
- 2. Press the 5 key to bring up the Unhide by Name
dialog box. Select faucet_loft and click Unhide to close the dialog
box. If you play the animation now, the Displace gizmo moves but has
no effect on the faucet mesh.

| 3. Select the faucet_loft
and click the Bind to Space Warp tool. Click the Select by Name tool,
highlight Displace01, and click the Bind button to close the dialog
box. Click the Move tool to turn off Bind to Space Warp. The faucet
is now bound to the space warp. If you look at its modifier stack,
it should have Displace Binding at the top.
|
- 4. If you play the animation now, there will still
be no change. We need to adjust some of the Displace space warp parameters.
Go to frame 25. Select the Displace gizmo, go to the Modify tab, and
set the Strength value to 0.5". Notice the effect on the faucet. Set
the Strength to 2". The bulge in the faucet gets bigger.
- 5. Drag down the Strength spinner of the Displace
to 1 1/8”. Add different values of Decay to see the effect and
then set Decay to 1.21. Notice that the displacement is more confined
to the area of the gizmo rather than distorting the entire model. Play
the animation to see the effect. Save your file as faucet_6.max.
|
|
|

| NOTE Decay creates
a distance falloff for the space warp effect.
|
Adjusting
the Effect Range
If you drag your time slider from frame 0 to frame 100, you will notice
that the animation starts with the bottom of the faucet being displaced
and ends with the spout being displaced. We want the effect to move in
and then move out, as if a burst of water is flowing in and out of the
faucet. We will pull the first and last vertices of the spline away from
the faucet to allow the space warp to move in and out of range of the
faucet.
- 1. Open faucet_6.max from the CD
or continue with your current file.
- 2. Go to the Display tab, click the Hide by Name
button, choose the path_faucet object, and click Hide.
- 3. With the left viewport active, press W to maximize
it. Click Zoom Extents.
- 4. Select the path_displace object and click the
Vertex Sub-Object button in the Modify tab. Go to frame 100 and select
the last vertex of the path_displace spline. Using the Move tool, drag
on the Y axis shaft of the Transform Gizmo to constrain to Y, and move
the last vertex down until the faucet is no longer effected by the gizmo.
- 5. Now we want to do the same to the first vertex
of the path. Go to frame 0. This time we will have to adjust the pivot
point of the object in order to constrain to the angle of the spline.
Leave the Sub-Object level, go to the Hierarchy tab, and click Affect
Pivot Only.

| 6. With path_displace
still selected, click the Align tool. Click the Select by Name tool,
choose path_displace (again), and click Pick. In the Align Selection
dialog box (Figure 11.26), check X and Y positions, check Pivot Point
under the Current Object and Minimum under Target Object, and click
OK. You have just moved the pivot point to the first vertex on the
path.
|
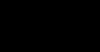
FIGURE
11.26 Align Selection dialog box
- 7. With the Rotate tool, move the cursor over the
blue pivot point center to constrain the rotation to the Z axis and
rotate the Pivot until its X axis is aligned with the path, as shown
below. Click the Affect Pivot Only button in the Hierarchy tab to turn
it off.
- 8. With the path_displace object still selected,
click the Vertex Sub-Object button on the Modify tab. Click the Move
tool and set the Reference Coordinate System to Local. Constraining
to the X-axis, move the first vertex away from the faucet until the
faucet is no longer affected by the Displace space warp at frame 0.
Play the animation. Save your file as faucet_7.max.
Adjusting
the Animation Length
Before we work on the burst of water, let’s adjust the length of
our animation. Currently the animation is set at the default 100 frames.
The project designer would like this project to be about 4 to 5 seconds
in length. With the animation being rendered at 30 frames per second,
we will need to adjust our animation length to be 120 to 150 frames. Let’s
adjust the length of the animation to 4 1/2 seconds, or 135 frames. We
don’t want to make the animation we have slower, so we will just
add 35 frames.
- 1. Open file faucet_7.max from the
CD or continue with your current scene.

| 2. Click the Time Configuration
button, in the Time Controls area next to the viewport navigation
tools. In the Animation area of the Time Configuration dialog box,
enter a Length value of 135 and exit the dialog box. We now have 35
frames after our path animation is completed.
|
Creating
the Water
To create the burst of water, we will use a Super Spray particle system.
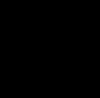
- 1. Make the top viewport active. Region-zoom into
the spout portion of the faucet. Under Create Ø
Geometry, choose Particle Systems from the drop-down list. Click the
Super Spray button.
- 2. In the top viewport, at the center of the faucet
opening, click and drag out a Super Spray icon until it is approximately
the diameter of the faucet opening, like the one in Figure 11.27. Drag
the Icon Size spinner in the Create panel until it reaches 1/2”.
If you need to, use the Move tool to center the Super Spray in the faucet
opening.
FIGURE
11.27 Top view of the Super Spray
- 3. Click the Rotate tool and then right-click it
to bring up the Transform Type-In. Change the Reference Coordinate System
to Local. Under Offset:Local, type 180 in the X axis field and then
press Enter. The Super Spray emitter rotates 180 degrees so that it
is now pointing down from the opening of the faucet. Close the Transform
Type-In.

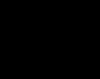
- 4. Right-click to make the left viewport active.
Go to frame 94, where we would like the water to begin coming out of
the faucet. Right-click over the Super Spray object and choose Move
from the shortcut menu. Move the Super Spray up, constraining to Y,
until it is centered in the bulge of the faucet opening, as shown in
Figure 11.28.
FIGURE
11.28 Left view of the Super Spray
Adjusting the Super Spray
Parameters
If you drag the Time Slider slowly, you will notice the particles emitting
between frames 0 and 30. We need to adjust the Super Spray parameters
so that the particles begin to emit at frame 94.
- 1. With the Super Spray icon selected, go to the
Modify tab, and open the Particle Generation rollout (Figure 11.29).
Check Use Total and set the number of particles to 150 in the field
below the check box.
FIGURE
11.29 Super Spray Particle Generation rollout
|
|
|

| TIP By checking
Use Total, we are asking the system to generate a total of 150 particles
over the life of the particle system. This setting works best for
bursts of particles. Checking Use Rate specifies the number of particles
to be emitted per frame. This setting is better for continuously flowing
particles rather than bursts.
|
- 2. In the Particle Timing section, set Emit Start
to 94 and Emit Stop to 95. Go to frame 94. Right-click in the perspective
viewport and click the Quick Render button. The particles are very small
and come straight out of the faucet.
- 3. Now we need to adjust our particles. Under Particle
Size, set the Size to 1.25". Set Variation to 15 percent to vary the
particle size, giving some added interest to the burst of water. Set
Grow For and Fade For each to zero.
- 4. Make sure you are at frame 94, right-click a
viewport, and press Shift+E to render with your last settings. The
particles are bigger and run together, yet they sure don’t look
like water, as you can see in Figure 11.30. We need to change particle
types.
|
|
|
|
| NOTE Grow For
defines how long it takes for the particles to reach full size. We
set this amount to zero so that the particles burst from the faucet
at full size. Fade For defines how long it takes for the particles
to diminish to 1/10 their original size. For this animation, we will
keep their size consistent.
|
FIGURE
11.30 Render of particle system with default
particle type
© 2000, Frol (selection,
edition, publication)
|
|
)
)
)
)
)
)
)
)
)
)
)