| |
| |
Mastering
3D Studio MAX R3 |
Simulating
Water with MetaParticles
MAX has eight standard particle types available to the Super Spray system.
It also allows you to assign MetaParticles and instanced geometry to the
Super Spray system. MetaParticles are particles that cling and regroup
based on their distance from each other, creating a more fluid-like effect.
For our animation, let’s try MetaParticles.
- 1. Close the Particle Generation rollout and open
the Particle Type rollout. In the Particle Types and Standard Particles
sections, you can see that currently we have Triangle standard particles.
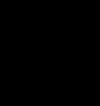
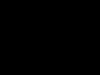
Check MetaParticles and render the perspective viewport again. Your
render should look something like Figure 11.31.
FIGURE
11.31 Render of particle system with MetaParticles
Now that we have something more fluid, let’s adjust other Super
Spray settings to get the effect we want.
- 2. Right-click an empty area of the Modify tab.
From the shortcut menu, select Basic Parameters. In the Particle Formation
section, set the Off Axis value to 5, the first Spread value to 16.5,
the Off Plane value to 40, and the second Spread value to 180. You may
want to take some time to play with these parameters to see their effects
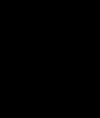
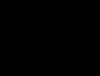
before setting them to these values. Render to check out their effect;
it should look like Figure 11.32.
- 3. Set the Percentage of Particles to 50. This is
the percentage of the particles that will appear in the viewport. It
won’t affect the rendering output; it just makes the viewport display
faster.
To make the water burst out of the faucet, let’s adjust the particle
speed.
FIGURE
11.32 Our particle system is looking more like
water.
- 4. In the Particle Motion section of the Particle
Generation rollout, set the Speed to 1". This is the distance the particles
travel in a frame. Set the Variation to 50 to create variations in emission
speed between particles up to 50 percent. Under Particle Timing, set
Display Until to 136 so that the particles will remain visible until
frame 136. Set Life to 42. This is the lifespan of each particle from
the time of creation. Since the particles began at frame 94, they will
remain visible throughout our animation.
- 5. Save your file as faucet_8.max.
Merging the
Faucet with the Rest of the Scene
It’s time to place the faucet animation into the bathroom scene
created by the rest of the team. The scene is set up with a camera, lights,
and materials ready for our use.
- 1. Open bathroom.max from the CD.
- 2. Under the File pull-down menu, select Merge.
In the browser, choose faucet_8.max—either the file
you just created or the version on the CD—and click Open. A Merge
dialog box appears, listing the items in the faucet file. Click All
and then click OK. The faucet appears in the scene.
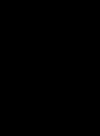
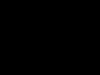
- 3. Make the Camera view active and render it; it’ll
look like Figure 11.33. Save as waterburst_1.max.
FIGURE
11.33 Our faucet, merged into the bathroom scene
Applying Materials to
the Faucet
Now we will apply materials to the faucet, using some of the materials
assigned to other parts of the scene.
- 1. Open waterburst_1.max from the
CD or continue working on your scene.

| 2. Select the faucet_loft
and press M to open the Material Editor. Click the sample sphere that
contains the material named Brass. Click the Assign Material to Selection
button.
|

| 3. Now we have to create
a material for the water. Select an unused sample sphere (the second
slot) and click the Get Material button. In the Browse From area of
the Material/Map Browser, check Mtl Library. Locate the Ground_Water
material from the 3dsmax.mat library; double-click
it to place it into the unused sample slot. Close the Material/Map
Browser.
|
- 4. Using Select By Name, select the Super Spray
object in the scene. Click the Assign Material to Selection button to
assign the Ground_Water material to the Super Spray.
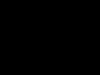
- 5. Go to frame 100 and render the Camera view, which
should look something like Figure 11.34.
FIGURE
11.34 What’s bursting from this faucet?!
Well, it looks a bit more like putty than water. Let’s adjust some
parameters in the material to make it appear a bit more realistic.
- 6. In the Material Editor, rename the Ground_Water
material Water Blob in the field beneath the sample spheres. Under Anisotropic
Basic Parameters, click the Ambient color swatch and choose a bright
cyan. Watch the sample slot as you change the values. The Ground_Water
material should begin to brighten up. (If you would like to use exact
RGB values, enter the following values: Red=18, Green=224, and Blue=255.)
- 7. Without closing the Color Selector, click the
Diffuse color swatch. Choose a sky blue (or enter Red=11, Green=126,
and Blue=207). Click the Specular color swatch and set it to pure white
(Saturation=0, Value=255). Close the Color Selector.

| 8. Water is transparent,
with the transparency greater in the middle than at the edges. So:
Set the Opacity to 25. Click the Background button to turn on a checkered
background in order to see the transparency effect. In the Extended
Parameters rollout, check In under Falloff for Advanced Transparency
and set the Amount to 41. This gives us our decrease in transparency
towards the edges. Click the Filter color swatch and choose a very
pale sea-green color (or enter Red=200, Green=241, and Blue=238).
|
|
|
|

| TIP Filter color
is great for creating bubbles and glass with many hues, and for casting
tinted shadows that vary in density relative to the object’s
transparency and filter color.
|
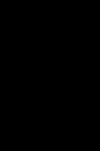
- 9. Go to Frame 98 and render the Camera view, which
looks something like Figure 11.35. Save your file as waterburst_2.max.
Synchronizing
the Animations
You may have noticed that the bathroom scene contains an animation of
the water tap on the right turning on and off. The faucet begins to turn
on at frame 10 and is open until frame 35. We will synchronize our water
burst with this animation by moving the Displace animation and altering
some timing values of the particles.
- 1. Open waterburst_2.max or continue
working with your current scene.
FIGURE
11.35 That’s more like it!

| 2. Using Select by
Name, select the Displace01. Open the Track View and, in the lower
left corner, click the Zoom Selected Object button. The Track View
hierarchy should display the Displace01 track. Open its hierarchy
to display the keys in its Position track.
|

| 3. Let’s move
the whole range of animation to a new location. Select the first key.
Using the Move Key tool, drag your cursor over the middle of the Position
range bar above the keys. Drag the range to begin at frame 35, when
the tap is fully open. Watch the time value of the first key change
from 0 to 35 as you drag. The Displace effect will now begin at frame
35 and end at frame 135. Close the Track View.
|
- 4. Now we need to adjust the timing of the particle
system so that the water comes out of the faucet 35 frames later. Using
Select by Name, select the SuperSpray01. In Modify Ø
Particle Generation, set Emit Start to 129 and Emit Stop to 130 (35
frames later).
- 5. We want the whole animation to be 180 frames.
Click the Time Configuration button and set the Length to 180.
- 6. In the Modify tab of the particle system, set
Display Until to 181 and set Life to 52 to ensure that the particles
will remain visible until the end of the animation. Save the file as
waterburst_3.max.
© 2000, Frol (selection,
edition, publication)
|
|
)
)
)
)
)
)
)
)
)
)
)
)
)