| |
| |
Mastering
3D Studio MAX R3 |
Adding a Scene
Event
Now that you have an understanding of the larger view of how Video Post
works, let’s go back and create a queue from scratch. First we’ll
add a scene event. A scene event can be any sequence of frames from any
viewport in your scene.
- 1. Reset MAX. Open your waterburst_4.max
from the last chapter or load it from the Chapter 11 folder on the CD.
- 2. First, let’s make it a little more interesting
for ourselves by adding a second camera. In the Create Ø
Cameras tab, click the Free button. Click in the right side of the front
viewport to create a camera.
|
|
|

| NOTE If you
prefer, you can create a target camera instead and manipulate the
target. The following steps allow you to practice using just the camera
navigation tools to manipulate your camera.
|

| 3. Right-click in the
left viewport to make it active; press C to change it to a camera
viewport. Use the Dolly button in the viewport navigation controls
to pull the camera back so that you can see the scene. Right-click
the viewport label and choose Smooth+Highlights.
|
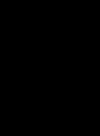
- 4. Using Dolly, Truck, Pan, and Orbit, maneuver
your camera so that it looks about like the view in Figure 12.2. If
you like a different view, use that, as long as it’s different
from the view in Camera01.

| 5. Open Video Post
by selecting Video Post from the Rendering menu. Click the Add Scene
Event button.
|
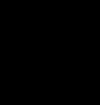
- 6. This brings up the Add Scene Event dialog box
(Figure 12.3). Choose Camera02 from the drop-down menu. Uncheck Lock
Range Bar to Scene Range and Lock to Video Post Range. Set Scene Start
to 126 and Scene End to 135; leave VP Start Time at 0 and set VP End
Time to 9. This means that frames 126 through 135 will be the first
10 frames rendered in our queue.
FIGURE
12.2 Get a different view than the one in Camera01.
FIGURE
12.3 Add Scene Event dialog box
|
|
|
|
| NOTE Notice
that Enabled is checked. If you uncheck this box for an event, that
event will be grayed out and ignored when the queue is executed.
|
- 7. Click OK to close the dialog box. You now have
a scene event in your queue. Leaving Video Post open, go back to the
scene and save the file as videopost01.max.
You can change these settings at any time by double-clicking the event
in the queue, bringing up the same dialog box. If you change the range
bars interactively by dragging in the window, the VP Start Time and VP
End Time will be changed accordingly. The Render Options button brings
up the same options that we saw in the Render dialog box in Chapter 11.
Adding an
Image Input Event
Now let’s cut to a pre-rendered image event. An image input event
can be any image file or any sequence of frames from a movie file.
|
|
|
|
| NOTE One thing
to consider when adding image input events is video compression. If
your file has already been compressed (as ours has), rendering again
with compression will degrade the image substantially through double
compression. In our example, we are simply demonstrating a cut, so
it doesn’t matter. In a real project, you would render your initial
files with a minimal compression such as Animation, or even uncompressed
(Full Frames), and then apply compression for the final cut in Video
Post.
|
- 1. Open videopost01.max from the
CD or continue working with your scene. If you don’t have Video
Post open, choose it from the Rendering menu.

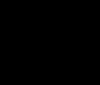
| 2. If the Camera02
scene event is highlighted, click somewhere else in the VPQueue pane
to deselect it. (If an event is selected, the next event added will
be nested with it.) Click the Add Image Input Event button. This brings
up the dialog box shown in Figure 12.4.
|
- 3. Click the Files button. Choose the waterburst.avi
file that you created in the last chapter or from the Chapter 11 folder
on the CD, and then click OK. Click the Options button. This brings
up the Image Input Options dialog box (Figure 12.5).
- 4. Under Frames, enter frames 136 and 145 in the
From and To fields. This means that we will render 10 frames of our
original shot between frames 136 and 146. Uncheck Loop at the End, leave
Step at 1, and click OK to close this dialog box.
- 5. Back in the Add Image Input Event dialog box,
set the VP Start Time to 10 and the End Time to 19. So the 10 frames
we just chose will render in the queue just after the 10 frames of our
scene event. Click OK to close the dialog box.
FIGURE
12.4 Add Image Input Event dialog box
FIGURE
12.5 Image Input Options dialog box
Before we move on, let’s discuss the other options available in
the Image Input Options dialog box. If you check Do Not Resize or Custom
Size under the Size section, the Alignment options are enabled. If you’re
bringing in images of different sizes, you can position them with these
controls. The Presets give you a visual image of the placement. Coordinates
allow you to set an exact X and Y value, in pixels, where you want to
position the image. Custom Size allows you to set the exact dimensions
that you want your image to be stretched or compacted to.
Step is just like Every Nth Frame in the Render dialog window. The Step
set to 1 means rendering every frame in the range; changing it to 2 would
render every other frame, and so on. Loop at the End repeats the chosen
series of frames to fill the duration of the range bar (between VP Start
Time and VP End Time).
© 2000, Frol (selection,
edition, publication)
|
|
)
)
)
)
)
)
)
)
)