| |
| |
Mastering
3D Studio MAX R3 |
Adding an
Image Filter Event
In Video Post, we can apply filters to an image for a specific duration.
Let’s apply one to our scene. We’re going to apply a glow to
the faucet by changing its object ID.
- 1. Select the faucet_loft. Right-click it and choose
Properties from the shortcut menu. In the G-Buffer section, change the
Object ID to 1.

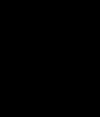
| 2. Select the Camera02
scene event in the queue and click the Add Image Filter Event Button.
This brings up the Add Image Filter Event dialog box. In the drop-down
box, choose Lens Effects Glow, as shown in Figure 12.6. Click OK to
close the dialog box.
|
FIGURE
12.6 Add Image Filter Event dialog box
|
|
|

| TIP You can
click the Setup button when adding the filter event, but in this case,
you won’t be able to see the effects of the filter on your actual
event. By adding the filter event and then double-clicking it in the
queue, the VP Queue button will be enabled when you click Setup. With
VP Queue on, the Preview button will show you the result of your filter
on your scene or image event.
|
- 3. Double-click the Lens Effects Glow event in your
queue. This brings up an identical dialog box to the one we just saw,
except it is labeled Edit Filter Event. Click the Setup button to bring
up the Lens Effect Glow dialog box. Click the VP Queue and Preview buttons
just under the preview window, so that you can see the effects of your
changes in the window. (Sometimes you also have to click Update to see
the effects of your changes.) In the Properties tab, under Source, check
Object ID and leave its default setting of 1. This selects our faucet
for the glow. In the Filters section, we choose which of the source
pixels we want to glow—for example, a particular brightness value
or hue. You may want to play with these settings for a while before
choosing All, since we want the whole faucet to glow.
- 4. In the Preferences tab, under Effect, set the
Size to 15. This limits the glow to within 15 pixels of the object.
Change the Color to User, click the color swatch, and select a peachy
color (or enter RGB values of 255,204,158). This changes the glow color
from the color of the pixels to the color we just selected. Set the
Intensity to 17.
|
|
|

| NOTE The User
color swatch under Color on the Preferences tab is not the same thing
as the Hue color swatch in the Filter section of the Properties tab.
What the hue filter does is select the pixels of that hue in the preliminary
render for the application of the glow. The user color swatch changes
the color of the glow itself.
|
- 5. Click OK to close the Lens Effect dialog box.
Add an Image
Output Event!
This one little thing has stumped more people than any interface designer
could have anticipated, so highlight the heading of this section in fluorescent
orange and put big stars on either side of it. Creating an output event
in Video Post is equivalent to checking the Save File box in the Render
dialog window: If you don’t do it, MAX will work merrily along, working
your processors to capacity to calculate all the pixels of each frame,
which will promptly be replaced by the pixels of the next frame until,
at the end, only the last frame remains in the Virtual Frame Buffer. You
will have just witnessed a piece of performance art in the digital realm,
one to remember fondly perhaps, but not saved to disk!
- 1. Click in an empty area of the VPQueue pane to
deselect the filter event that we just added. This is a very important
step. If you have an event selected and then add your output event,
the output event will be nested with that event, and only that event
will be saved to disk, as mentioned earlier.

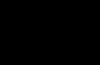
| 2. Click the Add Image
Output Event button. This brings up the dialog box shown in Figure
12.7.
|
- 3. Click the Files button. Choose where you want
to save the file to on your computer, name the file cut.avi, and click
the Save button. In the Video Compression dialog box, choose Cinepak
Codec by Radius, with a Compression Quality of 90 and a Key Frame Every
1 Frame. Click OK to close the Files dialog box.
FIGURE
12.7 Add Image Output Event dialog box
- 4. Click OK to close the Add Image Output Event
dialog box.

| 5. Click the Zoom Extents
button. Your queue should now look like this:
|
|
|
|
|
| TIP If you add
a scene or image input event after adding your image output event,
make sure nothing is selected in the queue and add the event. Then
drag it above the output event in the queue (or else it won’t
be saved as part of the output file).
|
Executing
the Video Post Queue
The Execute button is equivalent to the Render button in the Render dialog
window. If you remember how Video Post thinks—in a linear progression
through the queue, while paying attention to the hierarchy—executing
the queue will be just as simple.
- 1. Before clicking Execute, always check that your
output event is enabled (not grayed out). Make sure it is in the leftmost
level of the hierarchy. Make sure it is the last item in the queue.

| 2. Click the Execute
button. This will bring up the Execute Video Post dialog box (Figure
12.8). Everything in here we have already seen in the Render dialog
window.
|
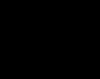
FIGURE
12.8 Execute Video Post dialog box
- 3. Click Render. If you watch the Virtual Frame
Buffer, you may notice the two separate render passes for each frame
with the glow effect added.
- 4. Choose File Ø
View File and open cut.avi. Play the file a few times.
Choose File Ø Save As and click
the + button to save your scene as videopost02.max.
If you want, you can go back to the queue and add a filter event to
the waterburst.avi image event, based on pixel color
rather than object ID.
© 2000, Frol (selection,
edition, publication)
|
|
)
)
)
)
)
)
)
)
)
)