| |
| |
Mastering
3D Studio MAX R3 |
Hands-on MAX: Compositing
Reflections of a Mirror with Another Image
This series of exercises will give you practice with the concepts and
procedures of compositing in MAX. We are going to composite an image into
the mirror of our bathroom scene from the last chapter. We are going to
deselect the mirror from the alpha channel and then select just the reflections
in the mirror to add back to the alpha channel. This way, when we composite
our render over our image file, the image will show through the mirror,
with the reflections overlaid on top.
Assigning
a Matte Material
First we need to change the mirror material into a matte, to give it
a zero value in the alpha channel while still blocking the wall behind
it.
- 1. Open the file waterburst_4.max
from the last chapter, or from the CD under Chapter 11, and save it
as alpha_mirror.max.
- 2. Using Select By Name, select the Mirror object.
Open the Material Editor. Select the first sample slot, called Mirror.
Click the Type button (the one that says Standard directly under the
sample slots and toolbar). This will bring up the Material/Map Browser.
Choose Matte/Shadow and click OK to leave the browser.
- 3. Uncheck Opaque Alpha under the Matte/Shadow Basic
Parameters. (We want our mirror to be selected as transparent, not opaque,
in alpha channel.)
- 4. Before we go any further, let’s just pretend
that we’re not sure we’ve chosen the right setting to get
the alpha channel we want. Click the Render Scene button, check Single
Frame, make sure Save File is not checked, and click Render.
The reflections in the mirror have disappeared. But let’s check
the alpha channel.

| 5. Click the Alpha
Channel button in the Virtual Frame Buffer. Your alpha channel should
look like Figure 12.10. The mirror is now black (that is, transparent),
so we can composite another image there.
|
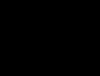
FIGURE
12.10 The alpha channel of the mirror
Capturing
the Reflections with a Raytrace Map
We still want the reflections in the mirror, partially transparent over
the image we will put in the mirror. To do that, we need to make a duplicate
mirror object.
- 1. With the Mirror object still selected, choose
Clone from the Edit menu. In the Clone Options dialog box, check Copy
and name the new object Mirror-reflections.
- 2. We’re going to put a raytrace reflection
map in the diffuse color slot to catch the color of the reflections.
With the Mirror-reflections object selected, select a new sample slot
in the Material Editor. (If you drag the line between the sample slots,
you can scroll to new material slots.) Name the new material Mirror-reflection
and click the Assign to Selection button. Click the Diffuse Map button
next to the color swatch labeled Diffuse. Choose Raytrace from the Material/Map
browser and click OK. In Trace Mode in the Raytracer Parameters rollout,
check Reflection. Click the Global Parameters button, check On for Fast
Adapative Antialiaser, and click Close.

| 3. Now we need to put
an instance of this map in its opacity slot so that only the reflections
will render. Click the Go to Parent button and scroll down to the
Maps rollout. Drag the Raytrace map from the Diffuse Color map button
to the Opacity map button. Choose Instance from the dialog box and
click OK.
|
- 4. Right now the matte Mirror object is in the same
place as the Mirror-reflections object, blocking the reflections as
well as the wall. We need to move it back just a little. Close the Material
Editor and select the Mirror object, using Select by Name. With the
camera viewport active, click the Move tool and then right-click the
Move tool. Type 0.01“ in the X value of Offset:World and press
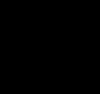
Enter. Press Shift+E to Render Last. Your image should look like
the one in Figure 12.11, with the reflections now showing in the mirror.
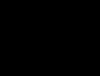
- 5. Click the Alpha Channel button. Your alpha channel
should now look Fig-ure 12.12. Note that the reflections in the mirror
are shades of gray, meaning that they will be partially transparent
when composited.
FIGURE
12.11 Captured reflections, after moving the
matte Mirror
FIGURE
12.12 The new alpha channel
Rendering
a 32-bit Targa Sequence
This time we’re going to render to a series of Targa files with
alpha channels.
- 1. With the same scene file open that you have been
working on, click the Render Scene button. Check Active Time Segment
and 320 x 240.
- 2. Click the Files button. Choose the directory
where you will be saving your files. Choose Targa Image File from the
Save As type drop-down list. Type alpha_mirror in the File name
field. Click the Save button.
- 3. In the Targa Image Control dialog box, check
32 Bits-Per-Pixel, Compress, and Pre-Multiplied Alpha. Uncheck Alpha
Split. Click OK.
|
|
|

| NOTE It is the
32 bits per pixel that tells you that you’re saving the alpha
channel: 8 bits for each of the red, green, and blue values of the
pixel, and 8 bits for the alpha channel value. If you saved the same
scene to 24-bit Targas, you would lose your alpha channel information.
|
- 4. Double-check that you are rendering Camera01
and that Save File is checked. You are ready to render.
|
|
|
|
| NOTE If you
don’t want to wait through the whole rendering process, the Targa
files are available on the CD, in the \Ch12\Targas
directory. You should copy them to your hard drive, so that it is
easy for MAX to make the image file list (IFL) file.
|
- 5. Save your scene file before you render. If you
are going to do the render yourself, then, um, click Render.
© 2000, Frol (selection,
edition, publication)
|
|
)
)
)
)
)
)
)